|
Vous désirez vous lancer dans le tissage peyote ? |
|---|
| Pour cette technique il vous faut : | ||||
|
|
||||
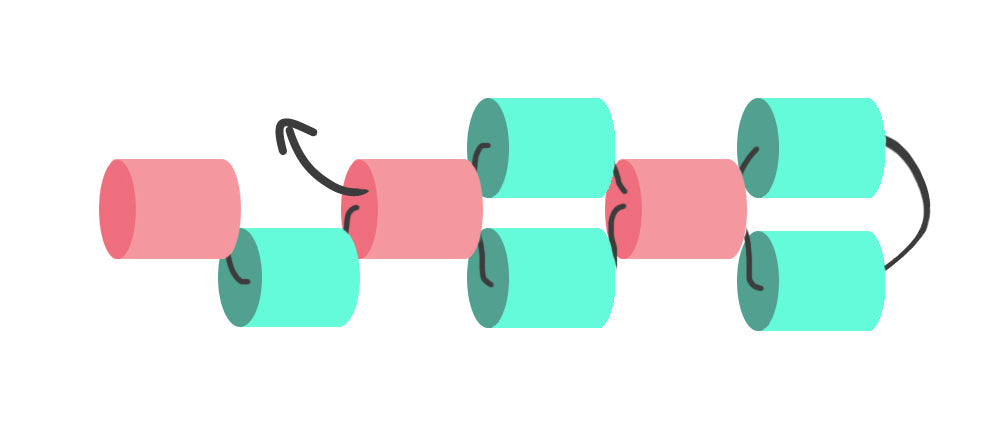
| Etape 1: | ||||
|
|
Pour commencer, coupez un fil nylon et enfilez-le sur une aiguille à perles. Ensuite enfilez un nombre pair de perles en laissant du fil au départ pour terminer le tissage. |
|||
| Etape 2: | ||||
|
Ensuite, enfilez une nouvelle perle pour commencer le deuxième rang. Passez dans l'avant dernière perle du premier rang puis enfilez une nouvelle perle. Suivez le schéma pour voir le trajet du fil. |
 |
|||
| Etape 3: | ||||
 |
Au fur et à mesure il vous suffit de placer une perle dans les creux de la rangée précédente. |
|||
| Etape 4: | ||||
|
Continuez ainsi jusqu'à la longueur souhaitée. |
 |
|||
| Que faire si je dois rallonger mon fil ? | ||||
|
|
Si votre fil est trop court pour terminer le tissage, veillez d'abord à conserver environ 15cm de fil. Ensuite passez le fil dans les perles précédentes en suivant un trajet qui peut aller en diagonale pour sauter d'une rangée à l'autre. Enfilez un nouveau fil puis repartez dans les rangées précédentes en diagonale afin de bloquer le nouveau fil et ressortir où vous vous étiez arrêté. |
|||
| Comment terminer le tissage ? | ||||
|
|
En Peyote il n'y a pas de noeud pour commencer ou finir le tissage. Pour terminer le tissage, repartez dans les perles et rangées précédentes dans plusieurs sens afin que le fil bloque les perles. Faites de même avec le fil de départ. Ensuite pour terminer, vous pourrez soit coller votre tissage sur une manchette rigide ou sur une bande de cuir ou bien placer un fermoir pour tissage. Pour cela il faudra réaliser une nouvelle rangée pour l'adapter au fermoir. Et Voilà ! |
|||
No product was found in this collection


Composez un bijou unique en sélectionnant Pierres de gemmes et apprêts doré à l’or fin 24K (Europe). Vous apprendrez les bases du montage, les harmonies de couleurs et les finitions propres—puis repartirez avec votre création, créé dans une ambiance conviviale à Paris 11e.
A réserver seule ou entre amies !

Rejoignez Perles Corner pour découvrir nos nouveautés, Tutoriels exclusifs et bien d'autres surprises... et recevez votre bon par email !


 des perles Miyuki délica